Food Hygiene
 Health & Safety
 Safeguarding
 First Aid
 Business Skills
 Personal Development


To clean an oven effectively, start by removing the racks and wiping out loose crumbs or debris. Next, mix baking soda and water into a thick paste and spread it over the interior surfaces. Let it sit for at least 20 minutes, then spray vinegar to loosen the grime. Finally, wipe everything clean with a damp cloth for a sparkling finish. For a quick refresh, steam the oven with lemon slices in a bowl of water—the natural oils help dissolve grease and leave a pleasant citrus scent.
Regular oven cleaning is essential for hygiene, safety, and better cooking results. A clean oven heats evenly, prevents smoky odours, and keeps your food tasting fresh. With just a few natural ingredients and simple steps, you can restore your oven’s shine and performance without harsh chemicals or stress.
In this detailed guide, you’ll learn how to clean an oven step by step, using affordable ingredients and easy techniques that actually work. Ready to restore that oven to its former glory? Let’s get started!
Table of Contents
How to Clean an Oven? (Step-by-Step Guide)
Cleaning an oven might sound like a big job, but with the right steps, it’s simple and satisfying. This step-by-step guide will help you remove grease, grime, and burnt residue easily—leaving your oven spotless and ready for your next meal.

Step 1 – Empty the Oven
Before you start scrubbing, remove everything from the oven—racks, trays, and liners. Cleaning becomes much easier when the interior is completely empty. Wipe away crumbs or burnt bits using a damp cloth or handheld vacuum to prevent them from smearing once cleaning products are applied.
This step might look simple, but it’s key to a spotless result. Even small crumbs can turn into a sticky mess when mixed with cleaners. Take a moment to clear out all debris and remove oven liners to wash separately. A clean, empty oven ensures better airflow and heating efficiency—now you’re ready to tackle those greasy racks!
Step 2 – Clean the Oven Racks
The oven racks are often the dirtiest parts, covered in baked-on grease and burnt residue. To clean them, fill your bathtub or a large container with warm, soapy water and add a cup of baking soda. Submerge the racks completely and let them soak for at least four hours—overnight works best. Then, scrub them gently with a soft sponge or brush to remove the loosened grime. For stubborn spots, apply a paste of baking soda and water, let it sit for 15–20 minutes, and scrub again.
Once clean, rinse the racks thoroughly with warm water and dry them with a towel to prevent water spots. You can also use a dampened dishwasher tablet for quick spot cleaning without soaking. Clean oven racks not only look better but also improve heat circulation, helping your food cook more evenly.
Step 3 – Create a Baking Soda Paste
Now for the real magic—making your homemade oven cleaner. Baking soda is a natural cleaning powerhouse, known for cutting through grease and neutralizing odours without the harshness of chemicals. To make your paste, mix ½ cup of baking soda with a few tablespoons of water until you get a thick, spreadable consistency.
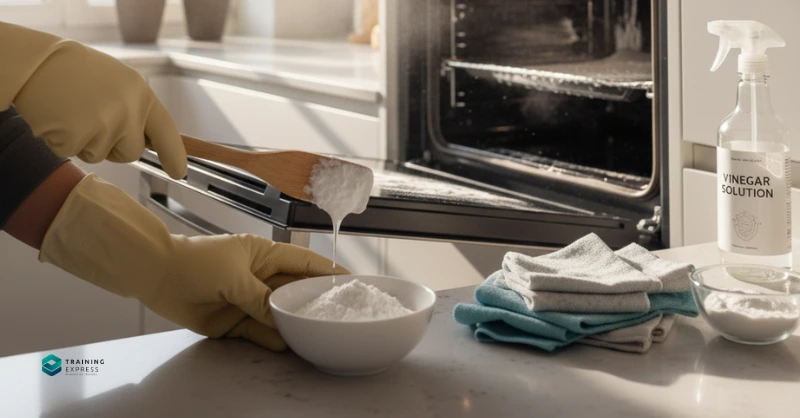
You can enhance the paste by adding a few drops of dish soap or white vinegar for extra degreasing power. Once your paste is ready, grab a pair of gloves—it’s time to apply it!
The beauty of baking soda lies in its mild abrasiveness and natural deodorizing properties. It loosens up burnt grease and grime without scratching your oven’s surface. Plus, it’s safe to use around food areas, unlike some commercial cleaners that release strong fumes.
Step 4 – Apply the Paste
Using a sponge or your gloved hands, spread the baking soda paste evenly across the oven’s interior surfaces. Avoid the heating elements, fans, or gas burners. Focus especially on the back wall, oven floor, and areas with visible grease buildup.
Don’t worry about perfection; the key is to coat every grimy spot. As the paste dries, it starts to absorb and lift away the stubborn grime. You might notice it turning brownish—that’s a good sign! It means it’s reacting with the grease and breaking it down.
If you’re cleaning a really dirty oven, apply a thicker layer and let it do most of the work for you. Once it’s coated thoroughly, the next step is patience—let that paste sit and work its magic overnight.
Step 5 – Let It Sit
Letting the baking soda paste sit is where the transformation happens. Ideally, give it 8–12 hours, or leave it overnight if possible. This gives enough time for the baking soda to break down carbonized food particles and loosen baked-on grease.

During this time, keep the oven door closed to prevent dust or pet hair from settling on the surface. If you’re cleaning during the day, you can use this downtime to wash the racks or tidy up the kitchen.
When you open the oven the next day, you’ll notice the paste has dried and darkened—that’s the grime it has lifted out. At this stage, your oven is almost ready for its grand reveal. Next, we’ll remove all that gunk and make it shine again.
Step 6 – Scrub and Wipe Clean
After letting the baking soda paste sit overnight, it’s time to remove all the loosened grime. Using a damp sponge or cloth, gently wipe down the interior surfaces. You’ll notice the grease and residue lift off easily. For tough, burnt spots, use a plastic scraper to avoid scratching the surface.
If the paste feels dry or sticky, lightly spray it with water or vinegar to reactivate it. Work in small sections to make sure no residue remains. Once all the paste is gone, the oven should look noticeably cleaner and brighter.
Take a few minutes to inspect corners and hidden areas—these often hold more grime than you’d think. A second wipe with a clean damp cloth will ensure every bit of cleaner and dirt is gone before drying.
Step 7 – Rinse and Dry
When you’ve finished scrubbing, it’s essential to rinse the oven completely. Wipe down all surfaces with a clean, wet cloth to remove any remaining baking soda or debris. Repeat this process until no white residue remains.
Finally, dry the interior with a soft microfiber cloth. This step helps prevent streaks and ensures the oven is ready for immediate use. A clean, dry oven not only looks great but also heats more efficiently and smells fresh during cooking.
Quick and Easy Oven Cleaning Methods
Cleaning your oven doesn’t always need to be a long, messy task. These quick and easy oven cleaning methods use simple household ingredients to cut through grease, remove stains, and refresh your oven in minutes—perfect for when you’re short on time!
Baking Soda and Vinegar Method
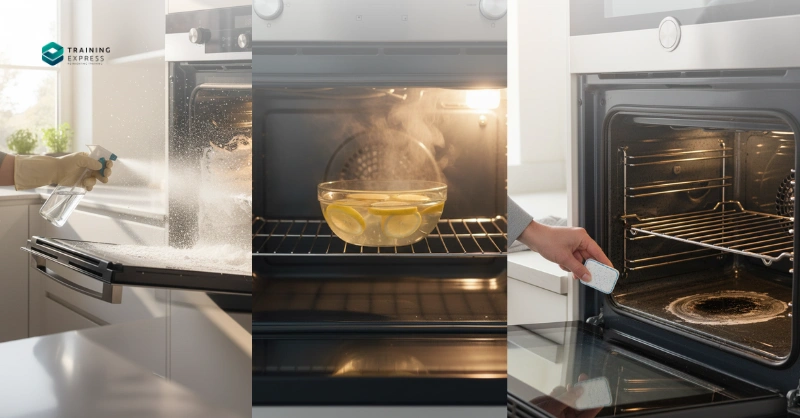
For a fast and effective clean, try the baking soda and vinegar combo. Simply sprinkle baking soda evenly inside your oven, then spray white vinegar over it. The mixture will foam and fizz, breaking down grease naturally.
Let it sit for 15–20 minutes, then wipe clean with a damp cloth. This method is perfect for light maintenance between deep cleans. It’s safe, eco-friendly, and leaves no harsh chemical smell behind.
Lemon Steam Method
If your oven smells unpleasant, the lemon steam trick works wonders. Slice two lemons and place them in an oven-safe bowl filled halfway with water. Set the oven to 250°F (120°C) and let it run for 20 minutes.
The steam softens grime while the natural citrus oils help dissolve grease. Once the oven cools, wipe the interior clean. You’ll be left with a sparkling surface and a fresh, citrus scent—no chemicals required.
Dishwasher Tablet Hack
Need a quick spot clean? Dampen a dishwasher tablet slightly and rub it gently over burnt spots inside your oven. The detergent in the tablet helps lift baked-on residue fast.
Once the stains loosen, wipe the area with a damp cloth. This trick is ideal for minor messes and requires no soaking or long waiting time.
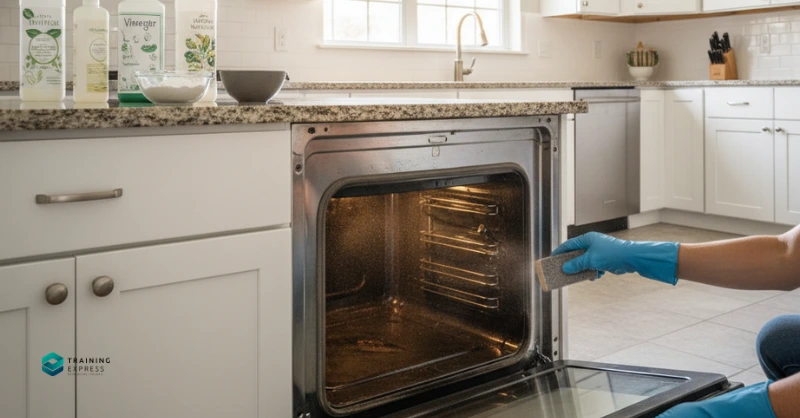
Alternative Cleaning Methods
When natural methods aren’t enough, there are several alternative ways to tackle tough oven grime. From using your oven’s self-cleaning feature to powerful commercial cleaners and even a pumice stone for burnt residue, these methods can restore your oven’s shine quickly and effectively.
Using the Self-Cleaning Feature
Most modern ovens have a self-cleaning mode. This feature heats the oven to around 900°F (480°C), turning food residue into ash. While convenient, it’s crucial to follow safety tips—remove racks, keep good ventilation, and avoid staying in the kitchen during the process.
After the cycle, wait for the oven to cool and wipe away the ash with a damp cloth. This method saves time but should be used sparingly to prevent excessive wear on your appliance.
Commercial Oven Cleaners
If natural methods aren’t enough, commercial oven cleaners can tackle heavy grease fast. Always wear gloves and ensure proper ventilation before applying. Follow the product instructions carefully and avoid spraying directly on heating elements.
After cleaning, rinse thoroughly to prevent chemical residues from affecting future cooking. Commercial cleaners work well for neglected ovens but should be used with caution.
Pumice Stone for Tough Stains
For stubborn burnt spots, a pumice stone can help—but use it carefully. Wet the stone and gently scrub only the metal interior surfaces. Avoid using it on glass or non-stick areas, as it can cause scratches.
The pumice stone effectively removes carbon buildup and burnt residue, making it a great tool for deep cleaning when other methods fall short.
How to Clean the Oven Door Glass
Cleaning the oven door glass is the final touch that makes your oven look brand new. Over time, grease splatters and baked-on stains can cloud the glass, making it hard to see inside. With a few simple steps and natural ingredients, you can restore its shine in minutes.
Step 1 – Make a Paste
The oven door glass is often the first thing you notice when your oven starts to look dirty. To restore its shine, make a thick paste by mixing baking soda and water. The paste should be smooth enough to spread easily without dripping. Baking soda works perfectly for glass because it’s mildly abrasive but won’t scratch.
If you prefer an extra cleaning boost, you can add a drop of dish soap or vinegar to the mix. This helps cut through oily smudges and stubborn food splatters that tend to bake onto the door.
Step 2 – Apply and Let It Rest
Spread the paste evenly over the glass using a sponge or soft cloth. Make sure to cover all stained areas, especially near the bottom where spills often collect. Once applied, let the paste sit for 20–30 minutes.

This resting time allows the baking soda to loosen baked-on grease and grime without scrubbing aggressively. If the glass is heavily soiled, you can leave the paste longer for deeper cleaning.
Step 3 – Wipe Clean
After the paste has set, use a damp microfiber cloth to wipe away the mixture. For any stubborn residue, gently scrape it off with a plastic scraper—avoid metal tools to prevent scratches.
Repeat the process if needed until the glass looks clear and smooth. A second wipe with a clean, damp cloth will remove any leftover baking soda film.
Step 4 – Finish with Glass Cleaner
To finish the job, spray a streak-free glass cleaner on the oven door and polish it with a soft, dry cloth. This final step gives your glass a crystal-clear shine and removes any lingering haze from cleaning products.
Now, every time you peek through the door, you’ll see your food cooking perfectly without smudges or grime blocking your view.
Oven Maintenance Tips to Keep It Clean Longer

Regular maintenance makes oven cleaning much easier. Instead of waiting for layers of burnt food to build up, try these quick habits:
- Wipe spills immediately – Once the oven cools, use a damp cloth to remove any drips or splatters before they harden.
- Use oven liners or trays – These catch spills and crumbs, preventing messy build-ups on the oven floor.
- Deep clean monthly – Even light cleaning once a month keeps the interior grease-free and odorless.
- Avoid harsh chemicals – Stick to mild or natural cleaners to protect your oven’s coating and extend its lifespan.
- Regularly check the door seal – A clean, tight seal keeps heat inside and improves cooking efficiency.
Following these tips saves you time and keeps your oven smelling and performing like new.
Closing Note
Keeping your oven clean isn’t just about looks—it’s about better cooking, safety, and hygiene. A spotless oven heats evenly, prevents smoke, and makes every meal taste fresh.
You don’t need expensive products or harsh chemicals either. Simple household items like baking soda, vinegar, and lemons can do wonders. With a little effort and consistency, your oven can stay sparkling clean year-round.
Remember, a clean oven is a happy oven—and it rewards you with better-tasting food and less hassle down the road.
Frequently Asked Questions (FAQ)
How often should I clean my oven?
Ideally, deep clean your oven every three months. However, if you cook frequently or notice smoke or burnt smells, clean it more often.
Can I use baking soda and vinegar together for oven cleaning?
Yes! The fizzing reaction between baking soda and vinegar helps break down grease effectively, making it an excellent natural cleaner.
What’s the fastest way to clean an oven?
The dishwasher tablet hack or lemon steam method works best for quick touch-ups without heavy scrubbing.
Is it safe to use a self-cleaning oven feature?
Yes, but always follow the manufacturer’s guidelines. Ensure proper ventilation, remove racks, and stay out of the kitchen during the cycle.
How do I remove burnt grease from the oven walls?
Apply a baking soda paste, let it sit overnight, then scrub with a damp sponge. For extra power, spray vinegar over the paste before wiping.
Can lemon juice really clean an oven?
Absolutely! Lemon’s natural acidity helps dissolve grease while leaving a pleasant citrus scent.
What should I avoid when cleaning an oven?
Avoid harsh abrasives, steel wool, or cleaners with ammonia—they can damage surfaces and coatings.
How do I clean the heating elements safely?
Unplug or turn off the oven first. Gently wipe the elements with a damp cloth—never use water directly or soak them.
Is it better to use homemade cleaners or commercial ones?
Homemade cleaners are safer and cheaper for regular maintenance, while commercial cleaners are best for heavy-duty grime.
How do I prevent bad smells from coming from my oven?
Regularly clean spills, use lemon steam refreshers, and keep the oven door slightly open after use to air it out.